I'd like to share couple things that i always do right before i start working on my shot. I got this tips from a q&a that i attended and from the lectures. I also kind of spice it up a little bit to suit my workflow :)
I'm going to pretty much talk, or maybe more appropriately write about how i set up my workspace. So here I go:
1. Starting up

In this tutorial I'm going to use Stewie :) so let's open your scene file in Maya.
Firstly, i like to hide the other elements that i don't want to see on my view port.
Here is how to do it:
- On your Main view port, go to Show> and choose None. Stewie will dissapear right after you do this :)
- Next, Go back to Show> and tick NURBS Curves, NURBS Surfaces, and Polygons, you could see them on the screenshot below (please click to resize ^^'') :

Now you should have a clean view of Stewie :)
I like to Tear off a copy of the view port Panel that i'm going to work on.
I would recommend you to copy the panel that will be used as the main camera angle for your shot.
For a purpose of example, here I copied the perspective view instead of my main camera angle..
Here is the step to do it:
- Firstly, on your view port go to Panels> choose Tear Off Copy...
- This will give you a copy of your Perspective or any view ports Panel.
Please see screen shots below:


New Tear Off Panel on screen left
A new panel window should pop up now.. and you could adjust the size of this copied panel and positioned it wherever you want on your workspace :)
You could always use the layout that has been provided by Maya and customize it. I found that if i have a side by side layout (ie: Perspective/ Front, Perspective/ New Camera) the camera gives me this funny wide angle effect like this:

This of course could be easily fixed by making the left panel bigger and this is not a big problem at all.. but i prefer to have my Main Camera - the one that i use to tweak my poses - on one big screen ;)
3. Lighting
On your new Tear Off Panel, choose Lighting> select Use No Lights and press 7 on your keyboard :
These are the screenshot of the result that you should get simultaneously :


Note: you could also press the highlighted button to turn off the light
Now you should have a mini copied window that could work as your 'Silhouette Monitor' :)
4. New Camera
On your workspace, you should now have your Main Panel and your Tear Off Panel.
On your Main view port Panel, go to Panels> Perspective > New.
This will give you a new Perspective camera and you could rename it too. I would recommend you to do this to avoid any confusion in the future. I usually use this new camera as my Main shot camera.
Below are the screen shots:


New Camera on the Main view port
This new camera will allow you to tweak your poses without changing your main camera angle and you could monitor your silhouette at the same time as well!
I would suggest to decide your main camera angle at early stage. This would train you to have an ability to choose and commit to one best camera angle that you want to use when you animate your shot (i'm still working on this myself! >.<!)
You could try to do this tips at any stage of your workflow, i personally always do this at the beginning stage of my workflow.
5. Posing Tips
- Pose your character in perspective view. This way you could monitor not only the X axis (translation X) but also the Z axis (translation Z) of your character's balance.
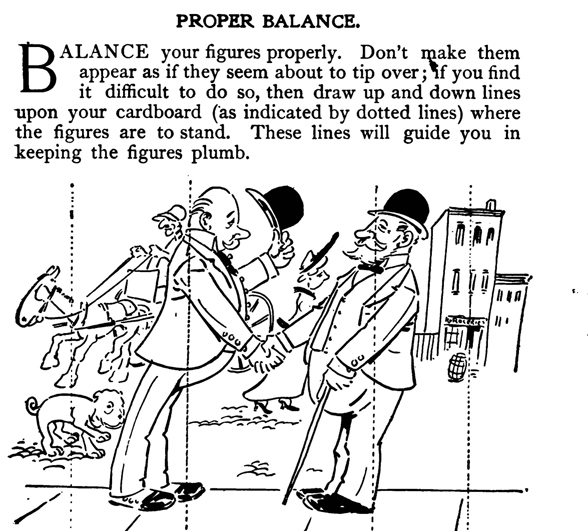
- Pay attention to your character's balance. Check the position of your character's center of balance and draw a straight line from that point. The amount of the weight on the left and the right side of the body should be approximately equal.
- Here is a video about balance:
- Draw Line of Action (LoA) over your pose using a program like Annotate Pro, Screen Marker, or you could also use a Dry Erase Markers, draw over your your pose on your monitor :)
- Follow the Line of Action to push your poses even further!

- Always check on your silhouette, it should look clear and readable. Avoid tangents as much as you can as this would make your silhouette clearer. I think this blog entry has a great explanation about tangents : Art School 101: TANGENTS
- my mentor advice that i'll always remember is to have your character in 3/4 view. This angle will give more dimension on your character and it will look more appealing than a pose that is seen from a front view.
I would also recommend you to read the following blog entries :
So that's it for now! Thank you very much for your time to read my post.
If you found any points that is unclear or confusing, feel free to leave comments or send me a pm on AM.
I hope this helps and most importantly, Have Fun guys! :)
---
No comments:
Post a Comment